.png)
Key events Show key events only Please turn on JavaScript to use this feature
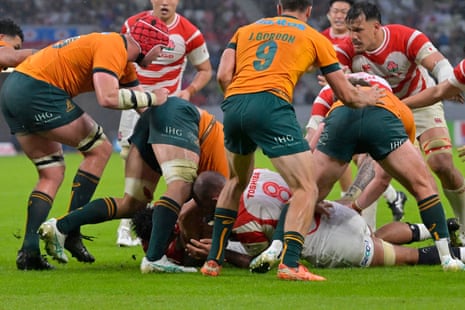
Full-time: Japan 15-19 Australia
The Wallabies hold on for a victorious start to their spring tour.
80 mins: Six slow phases of one-out drives bring the countdown clock almost to 80 minutes. Nothing flash from the Wallabies as they try to run the game out.
79 mins: Australia kick long to the left, secure easy lineout ball, set up a long slow rolling maul, and then put their heads down and bums up to grind the clock down.
78 mins: Japan hold their own at the scrum but as soon as it’s out Gordon does incredibly well to hunt down his opposite number. Then Paisani is on the breakdown in a flash and the turnover is inevitable. Massive moment late in the match.
77 mins: Japan’s lineout is messy, the ball hits the greasy turf and the knock-on is inevitable. But hang on – the TMO spots a gold hand on the ball in the lineout and instead of what felt like a decisive settling moment for the Wallabies, Japan get a scrum on halfway.
76 mins: Australia secure safe lineout ball and Gordon kicks long to halfway.
75 mins: Japan’s lineout is sharp and they gain momentum in midfield attacking to the left. A couple of short side phases draw bodies in with Tyler Paul prominent. Then the expansion to the right into the 22. Quick ball and back to the left with Paul busy again. This is good hustle from the hosts but it’s all very sideways and tight and eventually the left touchline proves their enemy. Excellent effort and ambition though, forcing Australia to scramble from coast to coast.
74 mins: Japan attack off the back of the scrum on halfway from left to right but Flook nails a heavy hit. The hosts trust their handling as they attack back to the right until there’s a chance to dab through a slippery grubber that is dealt with by the Wallabies and allows Gordon to pummel the ball back to halfway.
72 mins: Yet another scrum, this time on the far left, just outside Australia’s 22. Gordon dummies to the right then snipes down the short side, toeing ahead to gain plenty of territory – only for Ishida to dance and jink his way almost the entirety of the way back before he offloads infield. The Wallabies find the turnover and Gordon returns to his trusty boot in the wet conditions. Pietsch flies through but Japan secure possession, loft an up-and-under of their own, that Edmed can’t handle!
Japan almost picked their way through the congestion in that counterattack. They are really making Australia earn their lead.
70 mins: Japan’s turn to attack off the back of a scrum as they run to the left over halfway. There’s momentum and verve as they spin all the way to the right and towards the 22 – but Pietsch does superbly to win the tackle, hold his ground as the ruck forms and then gets his feet taken out from under him.
69 mins: Another Australian scrum, just outside Japan’s 22, tries to free Paisami but he’s nailed in the tackle. That’s followed by a brutal tackle by Era on Robertson that dislodges the ball and earns the turnover. There is head contact in that collision but the TMO does not identify foul play with both men so low they’re almost parallel to the ground.
67 mins: Australia’s scrum holds strong on the left and Paisami gains more hard-running metres on the burst. Japan regroup so Gordon goes to the sky and Leitch knocks on. That’s the last act for the veteran this afternoon and the crowd favourite jogs off to a hearty round of applause.
65 mins: Japan steal Australian lineout ball on halfway with a brilliant midair swipe. They kick possession away, but it returns soon as Leitch is first to the bouncing ball following Gordon’s up-and-under. There’s space opening on the right so the hosts go through hands at speed – but the final ball is too hard for Ishida to claim and Australia escape.
This is a heartening fightback from Japan. At times Australia have looked comprehensively the better team but they have failed to turn that ascendancy into points.
63 mins: Japan have had much more energy and momentum this half. They’ve kicked more than they’re run, playing the conditions and territory, and profiting from Australian errors.
CONVERTED TRY! Japan 15-19 Australia (Gunter, 61)
Yes they can! Japan’s scrum holds firm and a neat interplay in midfield almost sends Osada through. At the ruck the ball spills out and Fujiwara is first to get to it and he almost scurries over the line. Australia hold him up but in no time Gunter pounds into the fray to muscle the five points!
Lee dabs over the simple extras and Japan are right back in this!
60 mins: Ugly knock-on from Kellaway 10m from his own line as the ball bounces and skids off the wet turf following an opportunistic Japan kick-ahead. Can the Brave Blossoms hit back immediately, like the Wallabies just did?
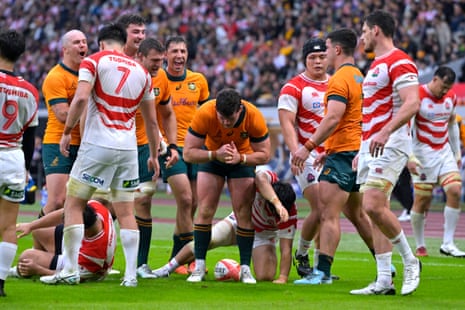
TRY! Japan 8-19 Australia (Tizzano, 57)
And Australia make no mistake. Edmed kicks to the left corner. Pollard naiuls the throw. Williams makes the catch. The maul forms and Tizzano finally, finally, gets the try he’s been denied repeatedly. Superb response from the Wallabies to that Japan score, a real show of controlled force.
Edmed can’t add the extra two points.
56 mins: Stung, Australia get right back into their work in attack on the left. Straightforward, one-out, wet weather running builds into 14 phases and gets inside Japan’s 22. Gordon then tries to pick the lock, Paisami sells a dummy for more metres. 5m out under the crossbar and the Wallabies return to the one-out driving until the referee calls play back for a penalty advantage that occurred maybe 10 plays beforehand.
TRY! Japan 8-14 Australia (Takeuchi, 53)
For the first time in attack Japan nail their lineout routine and Leitch hits the gold line at pace. Behind the ruck they threaten to cut to the right, switch back to the left, and Takeuchi is isolated one on one with Edmed, with only one possible outcome. Japan celebrate a try!
Lee’s conversion attempt from the left curls too much.
52 mins: A lot of kicking, and a lot of 50:50 chaos footy in these horrible wet conditions this half. Japan are sticking to the task though and get another attacking platform from a scrum penalty, kicking deep to the left corner.
50 mins: Edmed does well defensively to pounce on the bouncing ball and take contact. Kellaway then belts clear and Pietsch wrestles his man with intent. Japan kick away possession so Kellaway elects to run into contact to set up a drive. It doesn’t last long though as the conditions do for Edmed who can’t hold onto the bar of soap on the run.
49 mins: Japan are enjoying some rare momentum and hit the line hard for a few phases down the right right through Era and Leitch. That sets up a cute crossfield kick to the left wing with play recycled infield. Up to phase 10 and Osada does well to stand his ground on the left touchline. Still Japan press – until they lose control on the ground! Great creativity and ambition from the hosts but tenacious and disciplined defence from the Wallabies.
47 mins: Of course the lineout throw is awful and Australia can go through hands from right to left and clear their lines. Excellent pressure from Wilson in the jump to force that error.
45 mins: This time Australia win their lineout ball only to make a mess of things on the ground. Gordon and Nasser get in a mix-up and in the scramble Japan get first hands to the loose pill, find a pass to the left wing where they can toe ahead, chase, and drag Kellaway into touch just 10m out.
44 mins: Edmed kicks a penalty inside Japan’s 22 on the right to set up the first attacking platform of the half. It’s a poor throw though and Japan get a fingertip to it and are able to clear. Both sides have struggled with their lineout technique in these horrible conditions.
43 mins: Japan with the scrum just outside their 22, and they benefit from a free-kick. Fujiwara goes to the air and in the aerial collision the initial decision is knock-on against Gordon, but after a slight delay the scrum feed goes Australia’s way for the Japanese scrum-half baulking his box kick.
42 mins: Bell makes an immediate bursts, rumbling forward with red and white jerseys hanging off him. He offloads to Valetini who makes more metres as the Wallabies send the ball through hands to the right, ignoring the conditions. There’s one pass too many though and the ball goes to ground.
41 mins: As the rain hammers down in Tokyo we’re back under way for the second 40.
Perhaps the bigger stories to come out of the half are the injuries to Salakaia-Loto (ribs) and Canham (concussion) putting strain on Australia’s lock stocks before this end-of-season tour even touches down in Europe.
Half-time: Japan 3-14 Australia
And that concludes a wet, scrappy, one-sided half of Test rugby. Australia by far the better of the two teams in testing conditions, but an inability to score tries from three or four golden opportunities means the scoreline remains respectable for the hosts.
39 mins: Japan play on quickly from a penalty on halfway and run towards the Wallaby defencde in repeat phase play for the first time today. After five phases momentum is lost on the right wing, then Fujiwara is fortunate to get away with a fumble behind the ruck. Still the hosts press, after the siren, into phase 13 with play returning to the right through Gunter. Japan edge into the 22 but lack go-forward as Australia’s defence acts as aggressor. It’s little surprise when Tizzano jackals the breakdown turnover.
38 mins: No try! The TMO adjudged Nonggorr created space for Tizzano to spin through by getting ahead of the ball carrier and creating an obstruction. The correct decision in the end, but a third time this afternoon Tizzano thought he’d crossed only to be denied at the death.
… and this time Tizzano does get his try! Another short lineout, another rapid maul, ending with a Tasmanian Devil spin by the flanker over the line. But the TMO is taking a close look at Nonggorr’s involvement in the maul…
37 mins: Edmed kicks the penalty to the left corner.
Yellow Card - Japan (Takeuchi, 36)
Another Australian scrum on the centre spot allows runners to shear off to the left. There’s no connection at the breakdown though and Japan wrestle the play to a halt before Gunter is penalised for losing his feet.
Edmed thumps a kick inside the 22. Valetini wins it easily at the front. The maul forms and rumbles quickly 10-15m. This looks irresistible. Tizzano peels off, dives for the line, thinks he’s scored – but the on-field call is held up. While the TMO takes a look at any grounding the Japanese prop is sent for a ten minute spell for coming in from the side to bring the maul down.
35 mins: Yet another lineout throw misses its target and Japan can break in midfield. They make no ground before Paisami clears out forcefully at the breakdown, allowing a simple turnover.
33 mins: Another easy scrum win for Australia on halfway. This time they attack from right to left but Toole gets caught in possession and Japan can counter. They kick poorly to Flook, who belts the ball the other way, a passage ending with an Australian lineout on halfway.
31 mins: Another poor lineout throw from Japan concedes possession. This has not been a great half technically from the hosts.
CONVERTED TRY! Japan 3-14 Australia (Flook, 29)
Superb set-piece try from Australia. The scrum was powerful, then the running and timing from the backs afterwards was spot on. Paisami hit the line with Edmed in support to feed Kellaway on the charge. He does well to keep his head up, look inside and send Flook through unopposed. Training ground stuff.
Edmed can’t miss the conversion and the scoreboard starts to reflects Australia’s dominance.


28 mins: From the restart Japan deal with the initial incursion but knock-on in the air after box-kicking.
Penalty! Japan 3-7 Australia (Lee, 27)
22m out, just to the right of the posts, the Japanese fly-half gets the scoreboard moving for his team.